projects:blinker:work_logs:3_electronics
Differences
This shows you the differences between two versions of the page.
| Both sides previous revisionPrevious revisionNext revision | Previous revision | ||
| projects:blinker:work_logs:3_electronics [2022/02/17 02:24] – tjhowse | projects:blinker:work_logs:3_electronics [2022/02/27 05:40] (current) – tjhowse | ||
|---|---|---|---|
| Line 44: | Line 44: | ||
| {{: | {{: | ||
| + | |||
| + | |||
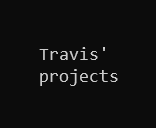
| + | ===== Assembly ===== | ||
| + | |||
| + | {{: | ||
| + | Finally! | ||
| + | |||
| + | The PCBs arrived and I soldered on one 25F supercap, the ISP header and two 2x1 SIL headers. I set my benchtop PSU to 2.8v and connected it to the solar panel input. It started drawing several amps as the caps charged up. I quickly dialled down a 100mA current limit, and the voltage slowly increased to the limit of the zener. | ||
| + | |||
| + | ===== Programming ===== | ||
| + | |||
| + | I had quite a lot of trouble getting the firmware onto them: | ||
| + | |||
| + | * USB extension to my workbench was too long, | ||
| + | * 3.3v/5v selector needs to be on 5v, | ||
| + | * The firmware in the USPasp was too old to support TPI, | ||
| + | * The JP3 jumper was not installed, this is required to enable 1 MHz programming speeds, | ||
| + | * I had to use Zadig to install the libusbK v3.1.0.0 driver, | ||
| + | * Arduino IDE reporting avrdude failure when it was actually succeeding. | ||
| + | |||
| + | After solving all of those problems I eventually got some basic code onto it and and recorded a progress video. | ||
| + | |||
| + | ===== Video ===== | ||
| + | |||
| + | {{ youtube> | ||
| ===== Next Time ===== | ===== Next Time ===== | ||
projects/blinker/work_logs/3_electronics.txt · Last modified: 2022/02/27 05:40 by tjhowse